1/19
Pokeball Interior: Modeling in Blender and Hand-Painted Texturing
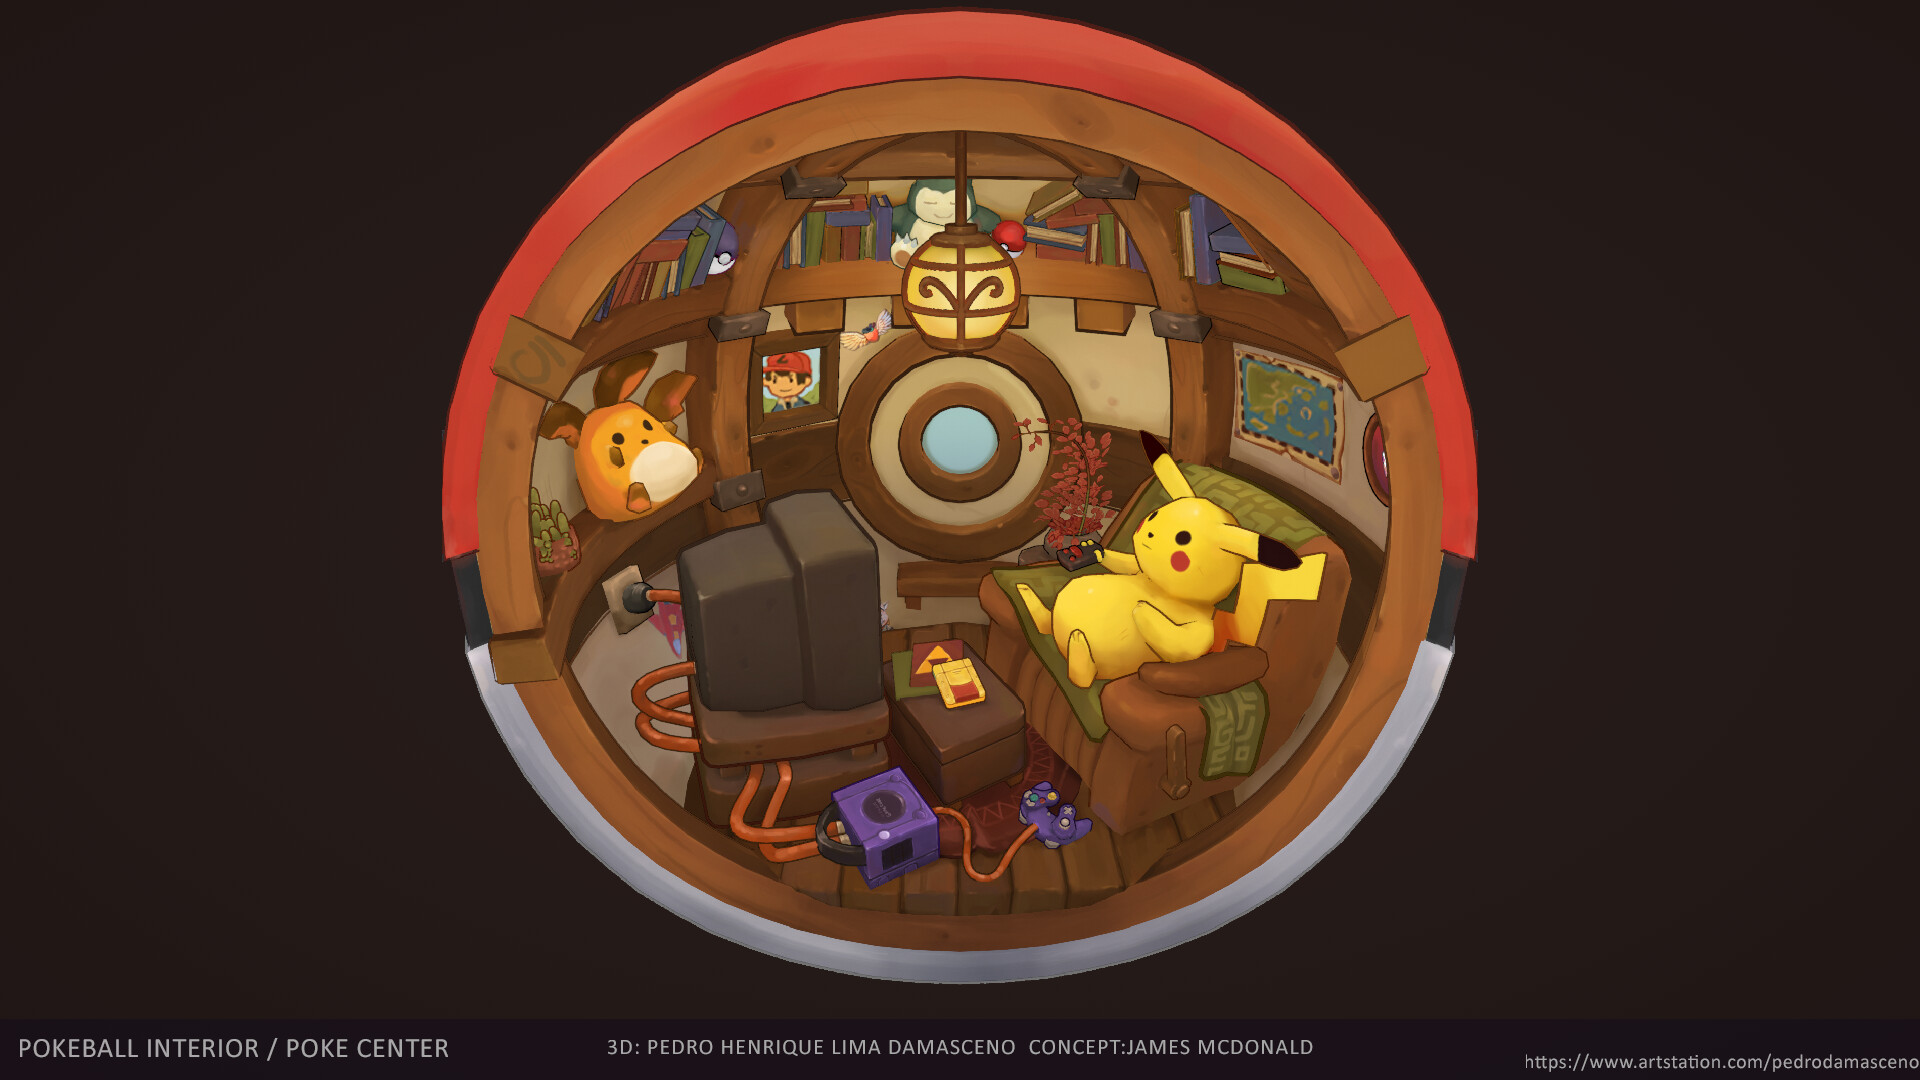
Pedro Damasceno, a 3D Artist from Brazil, details the creation process behind his Pokeball Interior project, focusing on modeling in Blender and hand-painted texturing techniques. His background in Digital Game Design provided him with a comprehensive understanding of game development, motivating him to work in the industry. The inspiration for the Pokeball Interior project stemmed from his admiration for James McDonald's artistic style and his childhood enjoyment of Pokémon games, providing a nostalgic and comforting experience during the COVID-19 pandemic. Other influences include Ghibli Films, pixel artists like Dan Fessler, Pixpil, and Saint11, as well as Brazilian culture, particularly from Minas Gerais.
The modeling phase in Blender began with aligning the camera configuration to the concept art to ensure accurate proportions between the 3D model and the original 2D drawing. This was facilitated by using the concept as a background image. The design incorporates elements of composition that contribute to a cozy and comfy feeling, such as curved lines and slightly rotated straight lines, avoiding a clean or serious aesthetic. Traditional poly-by-poly modeling was employed, and instances (Alt+D) were heavily utilized to edit objects while maintaining axis-alignment and using modifiers like mirror without complications, especially given the frequent rotation of objects.
For the Pokémon center, modeling required a tile-based approach rather than freestyle. Damasceno created a tileset before modeling, maintaining a 1:1 ratio between a Blender tile and a texture pixel. The 'Snap to Increment with absolute grid snap' tool was crucial for this process, as was the use of Alt+D for modular modeling. He also recommends the Sprytile addon. For simple props without complex shapes, low-poly models with a stack of modifiers in Blender were used, enabling a non-destructive modeling workflow and mesh reuse. UV unwrapping was assisted by free addons like TexTools and TexelDensity, and maintaining the tile-to-pixel relationship was vital to prevent pixel distortion, with Blender's snap by Pixel option proving invaluable.
The texturing process involved a six-step methodology: Base Color, Ambient Occlusion, Shadow, Light, Rendering (Material), and Details. Base colors were applied without lighting influence, separating faces by color. Ambient Occlusion highlighted contact areas where objects were exposed to ambient light. Shadow and Light stages involved painting with a specific light position in mind. Rendering differentiated materials based on their reflection and absorption of light. Finally, details included color variations and imperfections. The project was designed for Sketchfab, which presented shader limitations. To achieve a Line Art and illustration style with outlines, Damasceno manually reproduced the shader by duplicating the mesh, inverting normals, and enabling BackFace Culling. This comprehensive breakdown offers valuable insights into creating stylized 3D environments with hand-painted textures.
#EnvironmentArt #3DArt #Blender #StylizedArt #Texturing #GameDevelopment #HandPainted #Modeling #UVUnwrapping #EnvironmentArt #3DArt #Blender #StylizedArt #Texturing #GameDevelopment #HandPainted #Modeling #UVUnwrapping
0 comment in total
 No comments yet
You may also like
I used this unexpected Farrow & Ball paint in my living room – but this simple tweak transformed the space

8-Bit Bouquet is a pixelated vase that blends retro gaming with modern design

Nine creatives designing dreamy renderings
7 Examples of How to Show Off Interiors in Your 3D Models, As Selected by Sketchfab

'Modest amounts of color can make huge statements' – Farrow & Ball's color curator shares 5 simple ways to transform the home with paint
22 Game Room Ideas for the Ultimate Entertainment Hub

Enshrouded Bathroom Design: To Expand or Not to Expand?

Ten interiors with textured wall finishes by Clayworks that create visual interest
I Asked Interior Designers: 'How Do You Ensure a Room Isn't Boring?' These Are Their 5 Top Tips

The how-to behind the Land of Nod’s rainbow wall

6 great ways to use colour drenching in your home

Home & Design | A World of Interiors
Interiors | A tale through textures
15 Farrow & Ball paint colors in real homes – from calming blues to warm neutrals
Colorful, Trippy Tiles Made on a Custom-Built Machine
Is This Peak Game Room?

How to decorate with Farrow & Ball Railings, the best-selling soft black paint
Kids' Playroom Ideas Guaranteed to Spark Endless Creativity

3D stencilling is trending on TikTok and Instagram
How to Nail This Tricky But Surprisingly Trendy Farrow & Ball Paint Color