1/2
Feb 2024: Perimeter box-framing a decorative ceiling approach
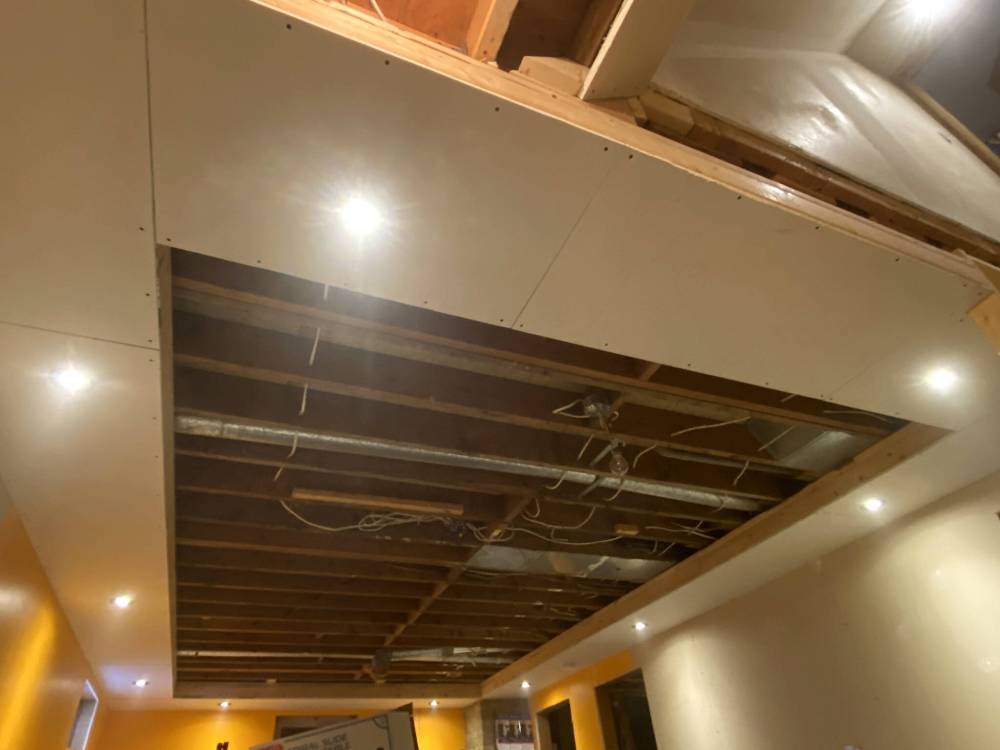
The article details a ceiling renovation project focusing on the installation of a decorative perimeter box-framing system, particularly for basement ceilings. The author, Marc LaBossiere, emphasizes the importance of starting renovation tasks from high to low, making ceiling modifications the initial step in any project. This approach is illustrated through the ongoing renovation of his own basement, which includes a rec-room, three-piece bathroom, laundry, utility room, and pantry. The primary challenge in the smaller rooms is concealing main heating and return ducts, which run parallel to the supporting wall and along the entry side of each room. The strategy involves framing at the highest possible elevation to hide the ducting, with the remaining ceiling areas to be fitted with suspended ceiling tiles.
For the rec-room, where ceiling joists are largely free from low-level ducting, the article proposes an alternative to a simple wall-to-wall suspended ceiling grid. Instead, the author advocates for perimeter box-framing, which serves multiple functional and aesthetic purposes. This boxing creates a clean, vertically square surface for mounting the suspended ceiling grid, effectively absorbing any irregularities or imperfections in the basement walls that could complicate grid installation. Additionally, it provides a dedicated, quarantined space for installing ambient lighting around the room's perimeter.
The construction of this box-framing involves creating outer supports using a 2x4 on the flat fastened to a staggered 2x4 on the vertical, resulting in a five-inch drop support. These supports are initially secured to the underside of the joists with construction screws, allowing for precise alignment adjustments, and then permanently fastened with six-inch lag screws through every other joist. The inner boxing support consists of a 2x4 attached to the wall, leveled with the underside of the outer support. Once the box-framing is complete, the underside of the perimeter is covered with drywall.
To integrate lighting, the electrical feed from a switch is routed to the first light position. Any necessary junction boxes are mounted within the area designated for the suspended ceiling to ensure permanent access. Holes for LED pot lights, typically four inches in diameter, are cut using an auger-bit. With the breaker off, 14/2 electrical wire is run between the holes, daisy-chaining the LED pot lights. After the wiring is complete and the breaker is restored, testing confirms the lighting's functionality. The subsequent steps involve drywalling the vertical faces of the perimeter boxing, followed by taping, mudding, applying corner bead, and finally sanding and painting. The article concludes by highlighting that this perimeter box-framing approach offers a sturdy vertical surface for the suspended ceiling grid and ample height for installation, while the integrated lighting ensures sufficient illumination, which can be controlled with dimmer switches for optimal ambiance.
#HomeRenovation #BasementRenovation #CeilingDesign #BoxFraming #SuspendedCeiling #DIYHomeImprovement #InteriorLighting #HomeDesign #RenovationTips #HomeRenovation #BasementRenovation #CeilingDesign #BoxFraming #SuspendedCeiling #DIYHomeImprovement #InteriorLighting #HomeDesign #RenovationTips
0 comment in total
 No comments yet
You may also like
10 Ways to Use Architectural Moldings in a Contemporary Home

This popular online framing service is so worth the money


The 2 Best Online Framing Services of 2025 | Reviews by Wirecutter
Custom Framing Makes Any Space Look Professionally Styled—And It's Easier Than You Think

Designers and property experts have called it - this unique front door colour is set to be huge in 2024
Kriskadecor's decorative chains unlock "creative possibilities" for ceiling installations
Portico shade structure opens up new possibilities

Crown Molding Ideas — 8 Ways to Make This Traditional Flourish Feel Modern
Should I Put Up a Ceiling Medallion? Our Experts Give a Verdict on Whether This "Elegant" Finish is in Style

Window Dressing

Ceiling trim ideas – 12 ways to enhance this architectural feature

How to See a Structural Column as an 'Oh-Wow' Moment, Rather Than an Obstacle

Decorative and architectural ceiling solutions

7 Glamorous Hacks to Transform a Boring White Ceiling

Ceiling Carrier System - Combi-Line from Hunter Douglas Architectural (Europe)


This is the Tile of the Year for 2024

The 2 Best Online Framing Services of 2026 | Reviews by Wirecutter

Design, Debated — Can You Put Decorative Ceiling Trim in a Modern Home? And More Importantly, Should You?
6 Types of Decorative Molding to Glam Up Walls and Ceilings
Ceiling makeovers uplifting