1/19
Make a Watertight Chimney Cricket
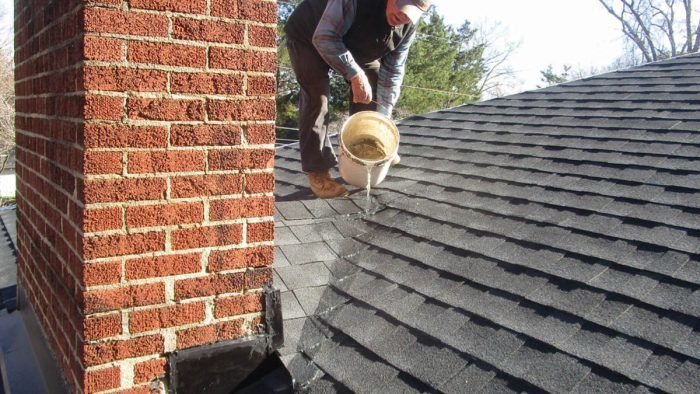
Chimney crickets are crucial for diverting water around chimneys on sloped roofs, preventing pooling and potential leaks. This article details the construction of a watertight chimney cricket using a 'math-free' technique for framing and time-tested flashing methods. It begins by explaining the necessity of a chimney cricket, especially for chimneys on steep roofs where water flow interruption can lead to significant problems. The example chimney, built in 1957, was over 5 ft. wide and located at the bottom edge of the roof, parallel with the eaves, meaning it received a large volume of water. The original flashing, a simple galvanized steel L-shaped pan, was inadequate and led to premature deterioration and leaks, causing unnoticed damage in the eaves.
The article emphasizes that crickets are a superior solution to redirect water and are now required by the International Residential Code (IRC) for chimneys with an uphill-facing side 30 inches or wider. The author advocates for crickets on all uphill-facing chimneys, regardless of size. The construction process starts with visualizing the layout. The goal is to have the cricket's ridge level and its sides match the roof's pitch, which in this case was 4-5/8:12. Instead of complex math, a full-size drawing on plywood is used as a visual aid and a template for measurement, cutting, and assembly. For instance, the cricket is built 68 inches wide (6 inches wider than the 62-inch chimney) to ensure the valleys extend 3 inches past each side.
To create the full-size layout, a 68-inch baseline is drawn on plywood, with the center marked at 34 inches. A perpendicular line is drawn, and the height of the gable end is calculated to match the roof pitch. The only significant calculation involves dividing the half-width (34 inches) by 12 and multiplying by the pitch (4-5/8) to find the gable height (approximately 13-1/16 inches). This height defines the gable end, and extending the centerline to the hypotenuse length (36-7/16 inches) completes the overall cricket footprint.
Framing the cricket begins on the ground. The gable end is made from three stacked 2x6s, with the bottom board ripped at a 21-degree angle to match the roof pitch. These pieces are screwed together after marking and cutting according to the full-size drawing. The ridge board requires a double bevel to form the peak, cut at 21 degrees on a tablesaw. Its length is initially 32-1/2 inches (34 inches minus the 1-1/2 inch gable thickness) and is later trimmed to accommodate the sleepers. Sleeper angles are determined visually using scrap wood and a miter saw gauge, resulting in 47-degree top miters and 43-degree bottom miters, with a 21-degree bevel for the bottom cut. The bevel angle along the sleepers, a crucial compound cut, is found by scribing on a scrap piece using the gable end as a guide, leading to a 61-degree angle cut with a Big Foot saw. The frame is then assembled, including jack rafters for ridges over 30 inches, and plywood sheathing is cut but not attached until the frame is on the roof.
Installation on the roof involves preparing the chimney by cutting horizontal reglets for the apron and counterflashing using a grinder and chisel, ensuring a consistent 1-inch depth. The aluminum apron, made 8 inches longer than the chimney's width, is bent with a 1-inch horizontal bend and a 1/2-inch vertical bend to secure it in the reglet and direct water. After installing starter shingles and the first course, the apron is fitted, marked, and cut to wrap around the chimney corners, then secured with lead wedges in the reglets and roofing nails on the horizontal leg, sealed with polyurethane. Shingles and step flashing are installed along the chimney sides, with each step flashing overlapping by 2-3/8 inches and the first pieces wrapping around corners. The cricket frame is then positioned over the top row, secured to the roof deck with screws, with flashing slipped underneath where it projects beyond the chimney sides. Plywood decking is installed, covered with self-adhering underlayment, and shingles are laid on the cricket, weaving the valley with the main roof. Finally, counterflashing, fabricated with the same profile as the apron, is installed in the reglets, overlapping by 1 inch, secured with lead wedges and pop rivets, and sealed at the brick-flashing seam with polyurethane sealant. This detailed process ensures a long-lasting, watertight chimney cricket, minimizing the risk of leaks associated with chimney obstacles on roofs.
#ChimneyCricket #Roofing #Waterproofing #HomeImprovement #FramingTechniques #FlashingInstallation #RoofLeaks #BuildingCode #DIYHome #ChimneyCricket #Roofing #Waterproofing #HomeImprovement #FramingTechniques #FlashingInstallation #RoofLeaks #BuildingCode #DIYHome
 لا توجد تعليقات بعد
How to draught-proof a chimney — 3 DIY solutions recommended by the experts
12 exterior areas of your home that are prone to leaks in rainy season – and how to prevent moisture getting inside

Brick Cladding: Helping keep moisture out

How To Choose The Best Tanking Slurry